You might call the last two years the years of ransomware. Ransomware was, without a doubt, the most popular type of malware. But at the end of last year, we started observing that ransomware was losing its popularity to coin miners. It is very much possible that this trend will grow as 2018 progresses.
From the point of view of the victim, this is a huge relief, because miners are not as much of a threat as ransomware. They slow down the system, yes, but once you get rid of them you can continue using your computer as before. No data is stolen, or lost as in the case with a ransomware infection.
From the point of view of a malware researcher, miners are so far disappointing. They don’t give enough interesting material for a deeper analysis, mostly because they are based on well-known open source components with little or no obfuscation.
However, from time to time, we find coin miners incorporating interesting tricks. In one recent sample, we observed a technique called “Heaven’s Gate” that allows the malware to make injections to 64-bit processes from 32-bit loaders. This trick is not new—its introduction is dated to 2009—but it’s curious to see it implemented in this new sample captured in wild.
Those who are beginners in malware analysis can read on for a guide about what Heaven’s Gate is and how to approach analyzing it.
Analyzed samples
- 7b3491e0028d443f11989efaeb0fbec2 – dropper #1
This sample was found in the continuation of the Ngay campaign (more about it here). A background check on similar samples lead me to the article of @_qaz_qaz, who described an earlier campaign with a similar sample. However, his analysis skipped details on the Heaven’s Gate technique.
- ed575ba72ea8b41ac2c31c8c39ce303b – dropper #2
- ca54fa2cf8a7e3e2cd457811f336de44 – loader 32-bit (unpacked first stage)
Behavioral analysis
To observe the mentioned injection, we must run the sample on a 64-bit system. We can see that it runs an instance of notepad, with parameters typical for mining cryptocurrency:
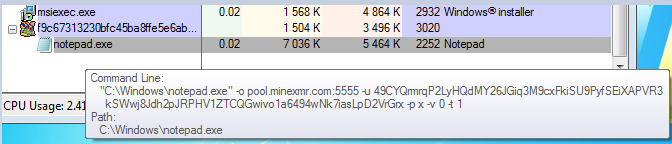
Looking at the in-memory strings in ProcessExplorer, we can clearly see that it is not a real notepad running, but the xmrig Monero miner:
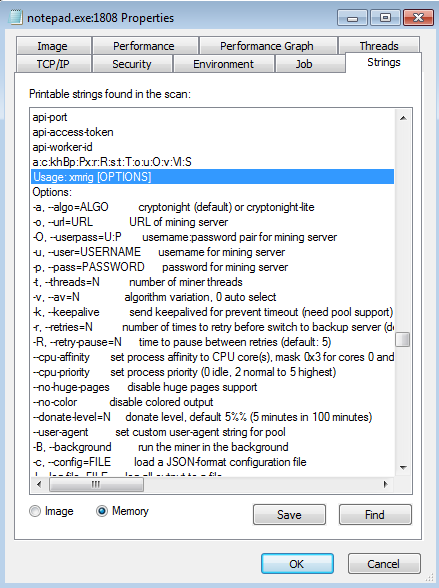
So, at this moment we’re confident that the notepad’s image has been replaced in memory, most probably by the RunPE (Process Hollowing) technique.
The main dropper is 32-bit, but it injects a payload into a 64-bit notepad:
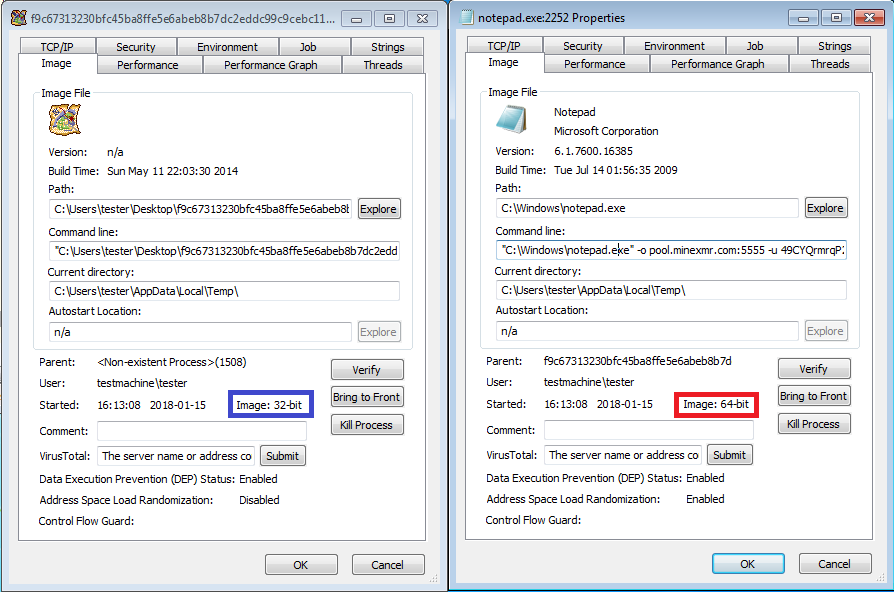
The fun part is that this type of injection is not supported by the official Windows API. We can read/write the memory of 32-bit processes from a 64-bit application (using Wow64 API), but not the other way around.
There are, however, some unofficial solutions to this, such as the technique called “Heaven’s Gate.”
Heaven’s Gate overview
The Heaven’s Gate technique was first described in 2009, by a hacker nicknamed Roy G. Biv. Later, many adaptations were created, such as a library Wow64ext or, basing in it, W64oWoW64. In the blog post from 2015, Alex Ionescu described mitigations against this technique.
But let’s have a look at how it works.
Running 32-bit processes on 64-bit Windows
Every 32-bit process that runs on a 64-bit version of Windows runs in a special subsystem called WoW64 that emulates the 32-bit environment. We can explain it as a 32-bit sandbox that is created inside a 64-bit process. So, first the 64-bit environment for the process is created. Then, inside it, the 32-bit environment is created. The application is executed in this 32-bit environment and it has no access to the 64-bit part.
If we scan the 32-bit process from outside, via the 64-bit scanner, we can see that it has inside both 32 and 64 DLLs. Most importantly, it has two versions of NTDLL: 32-bit (loaded from a directory SysWow64) and 64-bit (loaded from a directory System32):
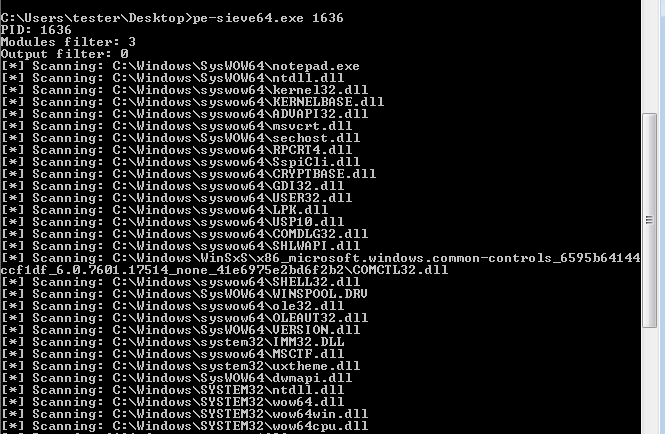
However, the 32-bit process itself can’t see the 64-bit part and is limited to using the 32-bit DLLs. To make an injection to a 64-bit process, we’d need to use the 64-bit versions of appropriate functions.
Code segments
In order to access the forbidden part of the environment, we need to understand how the isolation is made. It turns out that it’s quite simple. The 32- and 64-bit code execution is accessible via a different address of the code segment: 32-bit is 0x23 and 64-bit is 0x33.
If we call an address in a typical way, the mode that is used to interpret it is the one set by default. However, we can explicitly request to change it using assembler instructions.
Inside the miner: the Heaven’s Gate implementation
I will not do a full analysis of this miner because it has already been described here. Let’s jump directly to the place where the fun begins. The malware checks its environment, and if it finds that it’s running on a 64-bit system, it takes a different path to make an injection into a 64-bit process:
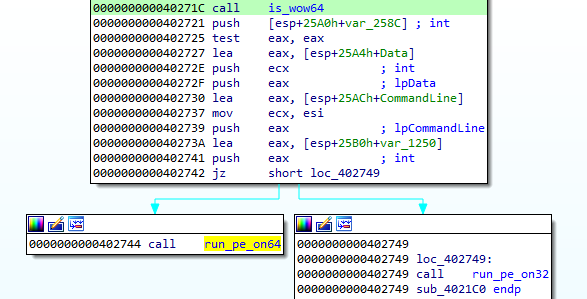
After some anti-analysis checks, it creates a new, suspended 64-bit process (in this case, it is a notepad):
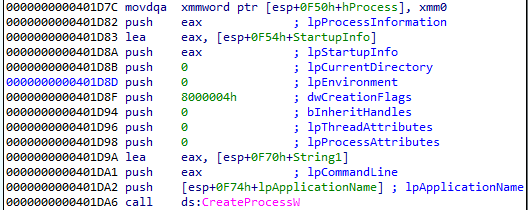
This is the target into which the malicious payload is going to be injected.
As we discussed before, in order to inject the payload into a 64-bit process, we need to use the appropriate 64-bit functions.
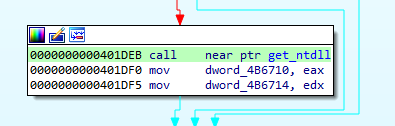
First, the loader takes a handle to a 64-bit NTDLL:
What happens inside this function get_ntdll requires some deeper explanation. As a reference, we can also have a look at the analogical code in the ReWolf’s library.
To get access to the 64-bit part of the process environment, we need to manipulate the segments selectors. Let’s see how our malware enters the 64-bit mode:
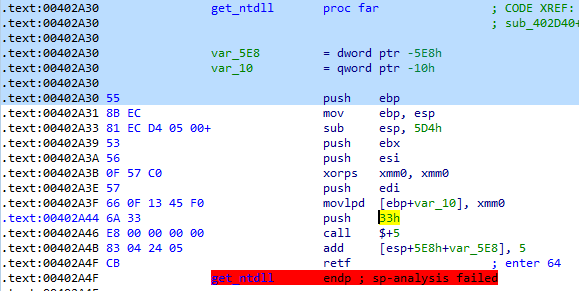
This code seems to be directly copied from the open source library: https://github.com/rwfpl/rewolf-wow64ext/blob/master/src/internal.h#L26
The segment selector 0x33 is pushed on the stack. Then, the malware calls the next line: (By this way, the next line’s address is also pushed on the stack.)
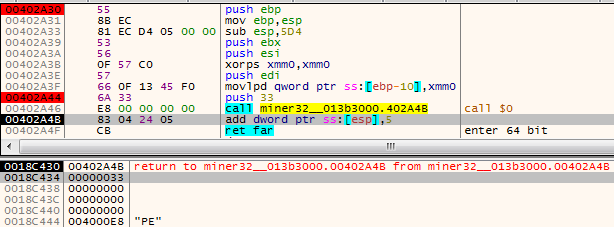
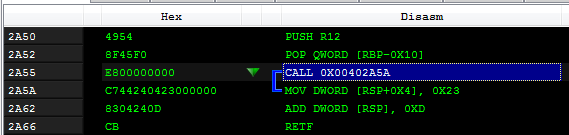
An address that was pushed is fixed by adding 5 bytes and set after the retf :
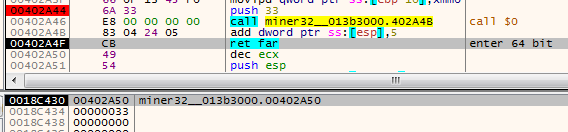
At the end, the instruction RETF is called. RETF is a “far return,” and in contrast to the casual RET, it allows to specify not only the address where the execution should return, but also the segment. It takes as arguments two DWORDs from the stack. So, when the RETF is hit, the actual return address is: 0x33:0x402A50 Thanks to the changed segment, the code that starts at the specified address is interpreted as 64-bit. So, the code that is visible under the debugger as 32-bit…
…is, in reality, 64-bit.
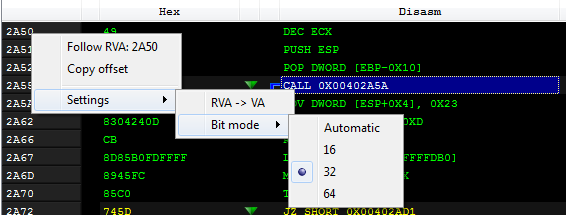
For the fast switching of those views, I used a feature of PE-bear:
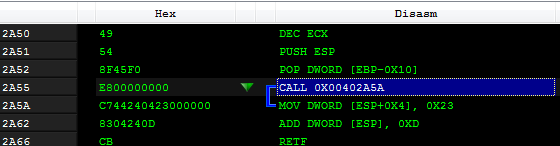
And this is how this piece of code looks, if it is interpreted as 64-bit:
So, the code that is executed here is responsible for moving the content of the R12 register into a variable on the stack, and then switching back to the 32-bit mode. This is done for the purpose of getting 64bit Thread Environment Block (TEB), from which next we fetch the 64-bit Process Environment Block (PEB) —check the analogical code.
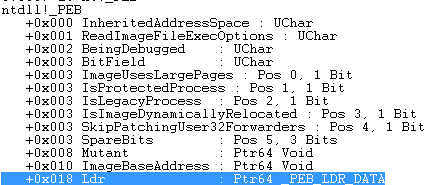
The 64-bit PEB is used as a starting point to search the 64-bit version of NTDLL. This part is implemented in a casual way (a “vanilla” implementation of this technique can be found here) using a pointer to the loaded libraries that is one of the fields in the PEB structure. So, from PEB we get a field called Ldr:
Ldr is a structure of the type _PEB_LDR_DATA. It contains an entry called
InMemoryOrderModuleList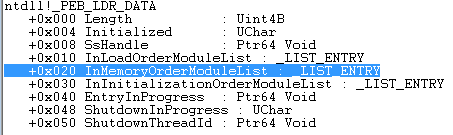
This list contains all the loaded DLLs that are present in the memory of the examined process. We browse through this list until we find the DLL of our interest that, in this case, is NTDLL. This is exactly what the mentioned function get_ntdll does. In order to find the appropriate name, it calls the following function—denoted as
is_ntdll_lib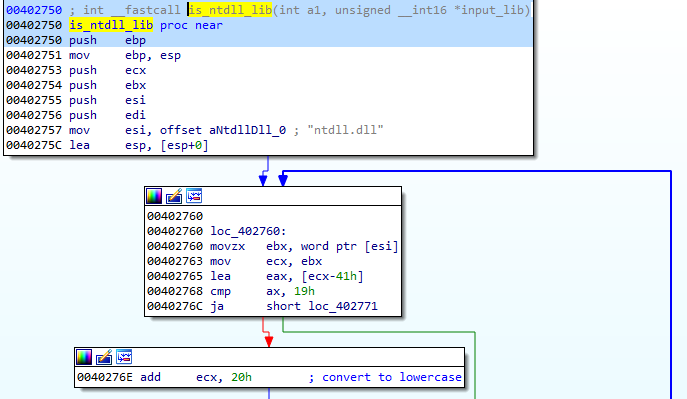
If the name matches, the address to the library is returned in a pair of registers:

Once we found NTDLL, we just needed to fetch addresses of the appropriate functions. We did this by browsing the exports table of the DLL:
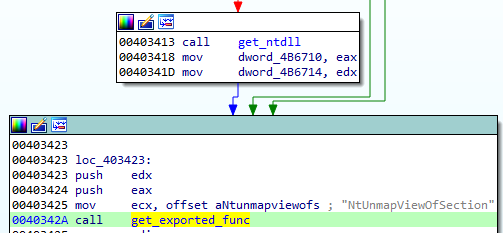
The following functions are being fetched:
- NttUnmapViewOfSection
- NtGetContextThread
- NtAllocateVirtualMemory
- NtReadVirtualMemory
- NtWriteVirtualMemory
- NtSetContextThread
As we know, those functions are typical for RunPE technique. First, the
NtUnmapViewOfSectionis used to unmap the original PE file. Then, memory in the remote process is allocated, and the new PE is written. At the end, the context of the process is changed to start the execution from the injected module.
The addresses of the functions are saved and later called (similarly to this code) to manipulate the remote process.
Conclusion
So far, authors of coin miners don’t show a lot of creativity. They achieve their goals by heavily relying on open-source components. The described case also shows this tendency – they made use of a ready made implementation.
The Heaven’s Gate technique has been around for several years. Some malware use it for the purpose of being stealthy. But in case of this coin miner, authors probably aimed rather to maximize performance by using a payload version that best fit the target architecture.