Malware can be made of many components. Often, we encounter macros and scripts that work as malicious downloaders. Some functionalities can also be achieved by position-independent code—so-called shellcode. But when it comes to more complex elements or core modules, we almost take it for granted that it will be a PE file that is a native Windows executable format.
The reason for this is simple: It is much easier to provide complex functionality within a PE file than within a shellcode. PE format has a well-defined structure, allowing for much more flexibility. We have certain headers that define what imports should be loaded and where, as well as how the relocations should be applied. This is a default format generated when we compile applications for Windows, and its structure is then used by Windows Loader to load and execute our application. Even when the malware authors write custom loaders, they are mostly for the PE format.
However, sometimes we find exceptions. Last time, when we analyzed payloads related to Hidden Bee (dropped by the Underminer exploit kit), we noticed something unusual. There were two payloads dropped that didn’t follow the PE format. Yet, their structure looked well organized and more complex than we usually encounter dealing with pieces of shellcode. We decided to take a closer look and discovered that the authors of this malware actually created their own executable format, following a consistent structure.
Overview
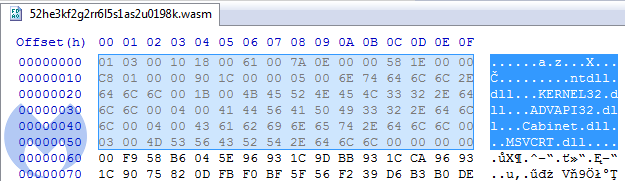
The first payload: b3eb576e02849218867caefaa0412ccd (with .wasm extension, imitating Web Assembly) is a loader, downloading and unpacking a Cabinet file:
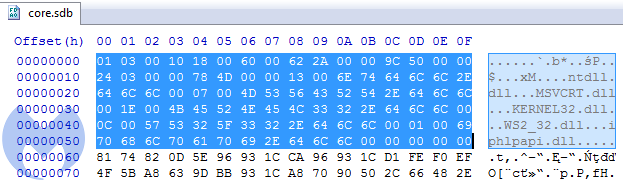
The second payload: 11310b509f8bf86daa5577758e9d1eb5, unpacked from the Cabinet:
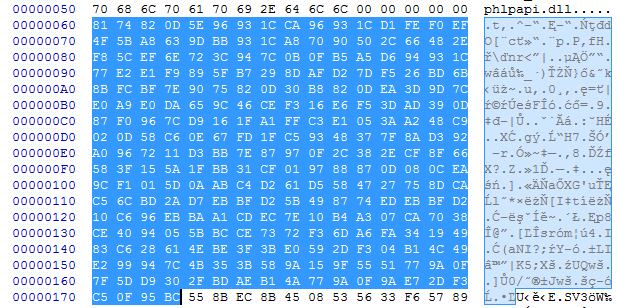
We can see at first that in contrast to most shellcodes, it does not start from a code, but from some headers. Comparing both modules, we can see that the header has the same structure in both cases.
Headers
We took a closer look to decipher the meaning of particular fields in the header.
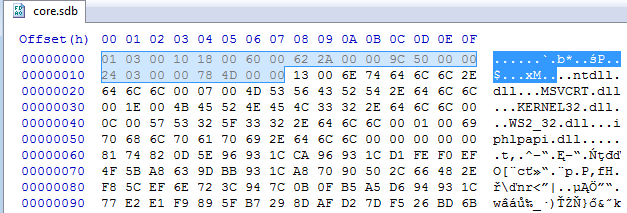
The first DWORD: 0x10000301 is the same in both. We didn’t find this number corresponding to any of the pieces within the module. So, we assume it is a magic number that makes an identifier of this format.
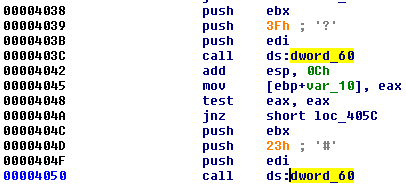
Next, two WORDs are offsets to elements related to loading the imports. The first one (0x18) points to the list of DLLs. The second block (0x60) looks more mysterious at first. Its meaning can be understood when we load the module in IDA. We can see the cross-references to those fields:
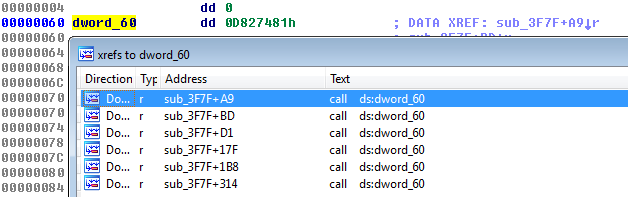
We see that they are used as IAT—they are supposed to be filled with the addresses to the imported functions:
The next value is a DWORD (0x2A62). If we follow it in IDA, we see that it leads to the beginning of a new function:
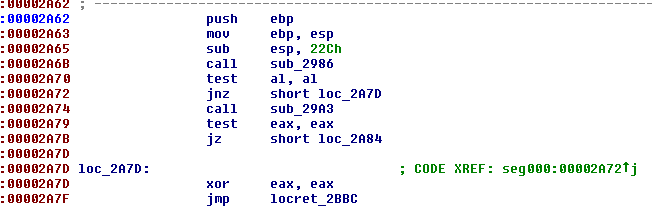
This function is not referenced by any other functions so we can suspect that it is the program’s Entry Point.
The meaning of the next value (0x509C) is easy to guess because it is the same as the size of the full module.
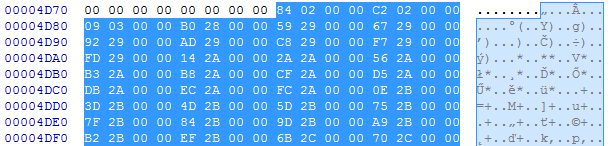
Then, we have the last two DWORDs of the header. The second DWORD (0x4D78) leads to the structure that is very similar to the PE’s relocations. We can guess that it must be a relocation table of the module, and the previous DWORD specifies its size.
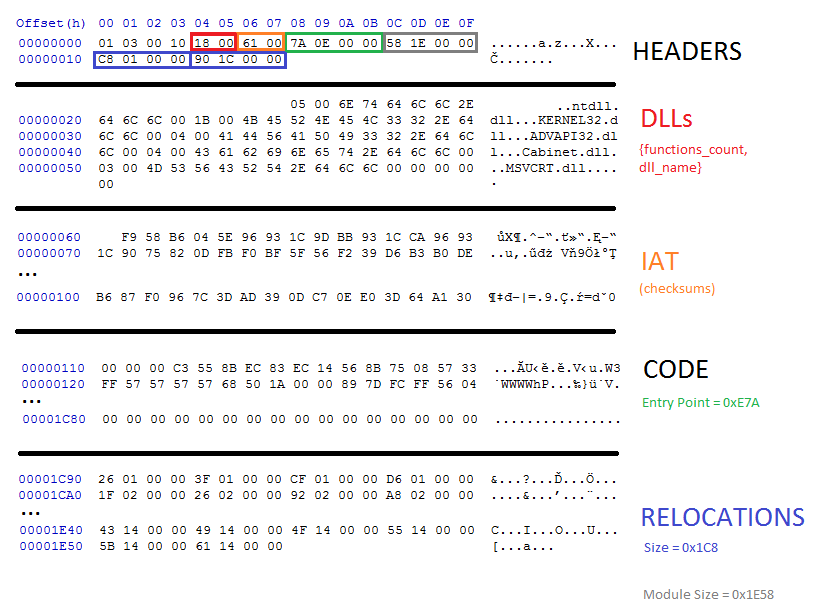
This is how we were able to reconstruct the full header:
typedef struct { DWORD magic; WORD dll_list; WORD iat; DWORD ep; DWORD mod_size;
DWORD relocs_size; DWORD relocs; } t_bee_hdr;
Imports
As we know from the header, the list of the DLLs starts at the offset 0x18. We can see that each of the DLL’s names are prepended with a number:
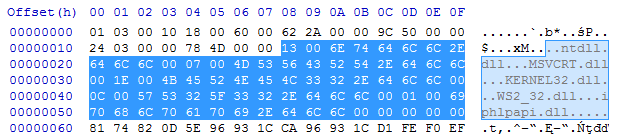
The numbers are not corresponding with a DLL name: In two different modules, the same DLL had different numbers assigned. But if we sum up all the numbers, we find that their total sum is the same as the number of DWORDs in the IAT. So, we can make an educated guess that those numbers are specifying how many functions will be imported from a particular DLL.
We can describe it as the following structure (where the name’s length is not specified):
typedef struct { WORD func_count; char name; } t_dll_name; Then, the IAT comes as a list of DWORDs:
It is common in malware that when the function’s names are not given as an explicit string, they are imported by checksum. The same is done in this case. Guessing the appropriate function that was used for calculating the checksum can be more difficult. Fortunately, we found it in the loader component:
DWORD checksum(char *func_name) { DWORD result = 0x1505; while ( *func_name ) result = *func_name++ + 33 * result; return result; } Knowing that we paired appropriate checksums with the function’s names:
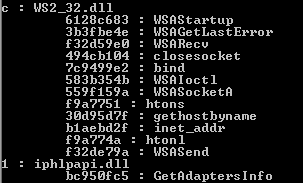
Once the address of the function is retrieved, it is stored in the IAT in place of the checksum.
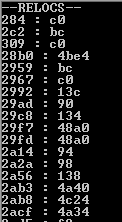
Relocations
Creating a relocation table is simple. It consists of the list of DWORDs that are identifying the offsets of the places in the code to which we should add the base where the module has been loaded. Without relocations applied, the module will crash (so, it is not position-independent like a typical shellcode).
Comparison to PE format
While the PE format is complex, with a variety of headers, this one contains only essentials. Most of the information that is usually stored in a PE header is completely omitted here.You can see a PE format visualized by Ange Albertini here.
Compare it with the visualization of the currently analyzed format:
Static analysis
We can load this code into IDA as a blob of raw code. However, we will be missing important information. Due to the fact that the file doesn’t follow a PE structure, and its import table is non-standard, we will have a hard time understanding which API calls are being made at which offset. To solve this problem, I made a tool that resolves hashes into function names and generates a TAG file to mark the offsets where each function’s address is going to be filled.
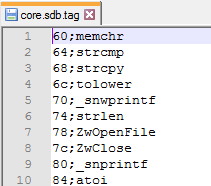
Those tags can be loaded into IDA using an IFL plugin:
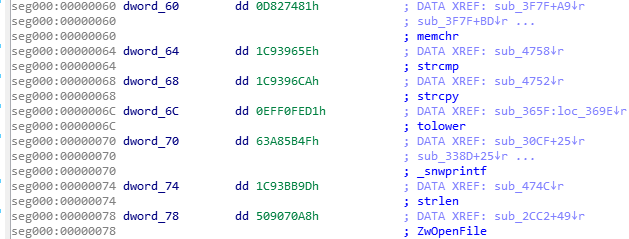
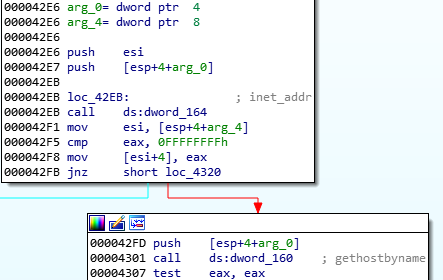
Having all the API functions tagged, it is much easier to understand which actions are performed by the module. Here, for example, we can see that it will be establishing the connection with the C2 server:
Dynamic analysis
This format is custom, so it is not supported by the typical tools for analysis. However, after understanding it, we can write our own tools, such as the parser for the headers and loader that will help to run this format and analyze it dynamically.In contrast to PE, the module doesn’t have any sections. So, we need to load it in a continuous memory region with RWX (read-write-execute) access. Walking through the relocations list, we will add the value of the base at which the module was loaded to the listed addresses. Then, we have to resolve the imported functions by their hashes and fill the addresses in the thunks. After preparing the stage, it just needs to jump at the Entry Point of the module. We will load the prepared loader under the debugger and follow to the entry point of the loaded module.
Simple but rare
The elements described here are pretty simple—they serve as a first stage of the full malware package, downloading other pieces and injecting them into processes. However, what makes them interesting is the fact that their authors have shown some creativity and decided to invent a custom format that is less complex than a full-fledged PE, but goes a step further than a typical piece of shellcode.
Such module, in contrast to independent shellcode, is not self-sufficient and cannot be loaded in a trivial way, but must be parsed first. Given the fact that the format is custom, it is not supported by existing tools. This is where programming skills come in handy for a malware analyst.
Fortunately, fully custom formats are rather uncommon in the malware world; usually, authors rely heavily on existing formats, from time to time corrupting or customizing selected parts of PE headers.