Given recent events and worries about data-leaks and other privacy issues, you might find it handy to have some tools to make it harder for third parties to unravel your data and communications.
One such method is encryption.
Data encryption is the process of translating readable data into something that appears to be random and has no meaning unless you know how to decrypt (reverse the encryption).
Decryption of data, encrypted by modern methods, usually requires the opponent to know about a flaw in the method or the way it was used.
In fact, the only practical way to protect your Internet communications against wiretapping or a “man in the middle” is by using encryption, but encrypting your communications not only protects against wiretapping but can also protect your communications while they are stored with your communications provider. So, for example, even if anyone is able to seize your emails from your provider, they won’t be able to read them.
Using encryption however is not always easy or without effort, so your decision of whether to use it will pose a trade-off: is the inconvenience of using the encryption worth the security benefit?
End-to-End Encryption of Specific Emails
Encrypting emails has historically been difficult, although the tools for achieving this kind of end-to-end encryption are getting better and easier to use.
Pretty Good Privacy (PGP) and its free cousin GNU Privacy Guard (GnuPG) are the standard tools for doing this. Both of these programs can provide protection for your email in transit and also protect your stored data.
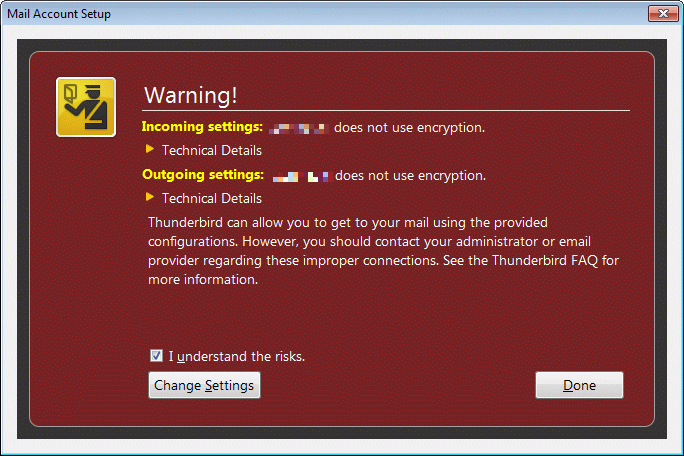
Major email clients such as Microsoft Outlook and Mozilla Thunderbird can be configured to work smoothly with encryption software, making it a simple matter of clicking a button to sign, verify, encrypt and decrypt email messages.
There are a few drawbacks. First, they only work if the other parties you are corresponding with also use them. The second catch is that you need to find and verify public keys for the people you are sending email to, to ensure that eavesdroppers cannot trick you into using the wrong key. Probably the easiest way to start using GnuPG is to use Mozilla Thunderbird with the Enigmail plugin. Enigmail is also available for Seamonkey.
Assuming you already have Thunderbird installed, I have written of a description of the path to sending encrypted mails.
In Thunderbird click Tools > Add-ons and look for Enigmail.
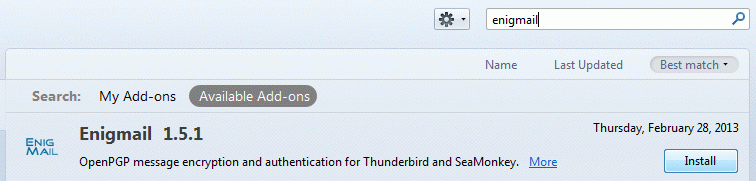
Install the extension and restart Thunderbird as prompted.

Then we will need to install GnuPG
We will get the installer from http://www.gpg4win.org/ as recommended by Enigmail
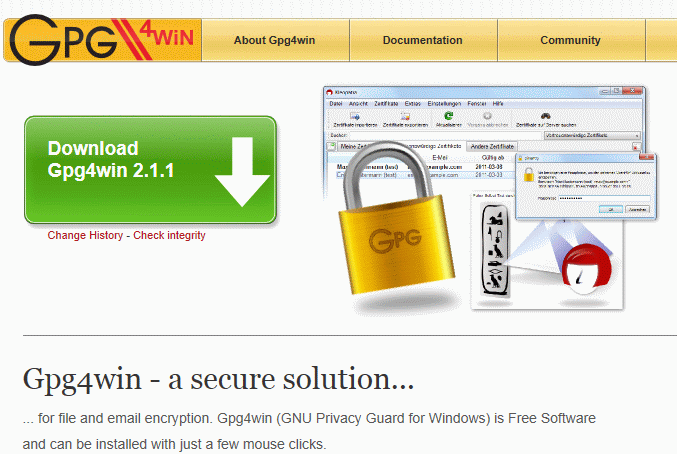
Select the one that is suitable for your computer. Then download and run the installer.

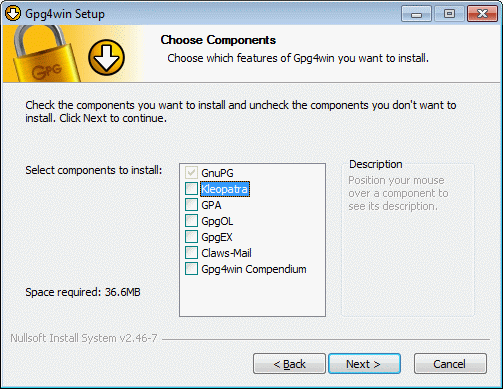
Follow the instructions of the installer. Hitting next all the time will do the job as well, but GnuPG is all you need.
That takes care of the installing. Now we need to configure your programs.
Under Tools in Thunderbird, you will now find an OpenPGP shortcut.
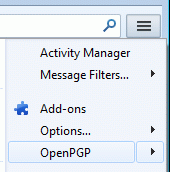
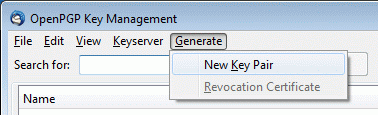
Use the Key Management option listed there. Now you will see the option to Generate a New Key Pair.
Doing so will present you with a form. In this form you can tell Thunderbird for which account to use the upcoming keypair and you need to pick a pass-phrase.
Please do this carefully. Private keys are so important that GnuPG will not use them unless you know the secret phrase. You’re being asked here what the secret phrase should be for your new keypair. If at all possible, choose something that is easy to remember but very hard for someone to guess. Enter your passphrase in the “Passphrase” box. Then repeat it again in the “Passphrase (repeat)” box.
If you forget your passphrase, there is absolutely nothing anyone can do to help you. This is a security feature of GnuPG. There is no way around the passphrase.
When you finish creating your new key, Enigmail will give you the chance to create a revocation certificate. If you want one, click “Yes”. You will be asked to enter your passphrase. Enter it, and you’ll be finished. A revocation certificate can be sent out in case your keys get lost, for example as a result of a hard drive crash. The revocation notice tells your contacts not to use that particular key anymore.
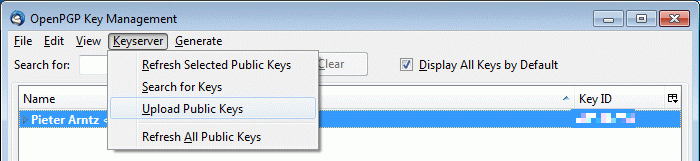
Now that you have your key, you should find your key ID. This is a sequence of letters and numbers eight long which is used to identify your key. You will need it to publish your key. The best way to do this can be found in the Key Management menu again, you will find the Upload Public Keys listed like this. The server that Enigmail presents as default is the main server that is commonly used for this.
After uploading your key, anyone who wishes to have an encrypted communication with you, will be able to find your public key and send you an encrypted message. And the private key, which is stored on your computer will be needed to read the message.
Sending signed and encrypted mail
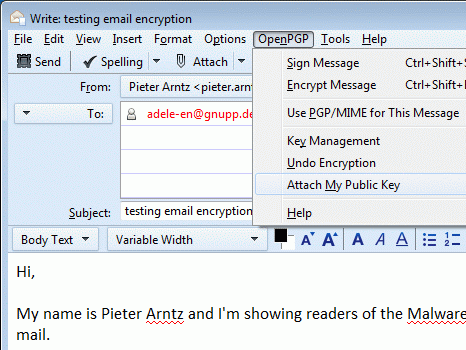
The first option you have now is to sign your mail. This will ensure the receiver the mail really came from you and was not spoofed. At the top of your Compose window you will see a button reading “OpenPGP”. Click on this. Make sure that the “Sign” option is checked. Hit “Send”. You will be asked for your passphrase. Once you enter it, Enigmail will sign your email and send it off.
But of course our main goal was to encrypt our mail. Using the Search for Keys option you can find the keys of people that you would like to send encrypted mail. If you have found someone that does not have their key published, ask them for their key ID. This will be an eight-character sequence of letters and numbers. Write it down, and then open up the Enigmail Key Manager OpenPGP > Key. From there, click on Keyserver > Search for keys”. Enter the person’s key ID in the search box, prefixing it with “0x”, if necessary.
The entry should start with 0x followed by 8 hexadecimal numbers (0 to F). Make sure your internet connection is active and click “OK”. Enigmail will begin searching through the keyserver looking for the key you want. If Enigmail finds it there, it will be added to your own local copy of keys.
Once you’ve obtained a copy of your correspondent’s key, you’re set to send encrypted email. Enigmail does not work very well with HTML email. While it can be made to work, it’s pretty far beyond the scope of this guide. If you normally compose your email in plain text, then you’re just fine. Write an email to them just as you normally would, but before sending, click on the OpenPGP button and select “Encrypt”.
Once that’s done, click “Send”. Well done, you have sent an encrypted email.
Conclusion
As promised, it is a bit of work to use encrypted mail, and, as always, the decision if it is worth your time and trouble is one that only you can make. In some cases however, the old saying, better safe then sorry is a valid one.
Source: http://www.enigmail.net/documentation/quickstart.php