Petya is different from the other popular ransomware these days. Instead of encrypting files one by one, it denies access to the full system by attacking low-level structures on the disk. This ransomware’s authors have not only created their own boot loader but also a tiny kernel, which is 32 sectors long.
Petya’s dropper writes the malicious code at the beginning of the disk. The affected system’s master boot record (MBR) is overwritten by the custom boot loader that loads a tiny malicious kernel. Then, this kernel proceeds with further encryption. Petya’s ransom note states that it encrypts the full disk, but this is not true. Instead, it encrypts the master file table (MFT) so that the file system is not readable.
[UPDATE] READ ABOUT THE LATEST VERSION: GOLDENEYE
PREVENTION TIP: Petya is most dangerous in Stage 2 of the infection, which starts when the affected system is being rebooted after the BSOD caused by the dropper. In order to prevent your computer from going automatically to this stage, turn off automatic restart after a system failure (see how to do this).
If you detect Petya in Stage 1, your data can still be recovered. More information about it is [here] and in this article.
UPDATE: 8-th April 2016 Petya at Stage 2 has been cracked by leo-stone. Read more: https://petya-pay-no-ransom.herokuapp.com/ and https://github.com/leo-stone/hack-petya. Tutorial helping in disk recovery is here.
Analyzed samples
- dfcced98585128312b62b42a2a250dd2 – zipped package containing the malicious executable
- af2379cc4d607a45ac44d62135fb7015 – the main executable
- 7899d6090efae964024e11f6586a69ce – Setup.dll
- d80fc07cc293bcd36e630d45a34aca11 – a dump of Petya bootloader + kernel
- 7899d6090efae964024e11f6586a69ce – Setup.dll
- af2379cc4d607a45ac44d62135fb7015 – the main executable
Main executable from another campaign (PDF icon)
Special thanks to: Florian Roth – for sharing the samples, Petr Beneš – for a constructive discussion on Twitter.
Behavioral analysis
This ransomware is delivered via scam emails themed as a job application. E-mail comes with a Dropbox link, where the malicious ZIP is hosted. This initial ZIP contains two elements:
- a photo of a young man, purporting to be an applicant (in fact it is a publicly available stock image)
- an executable, pretending to be a CV in a self-extracting archive or in PDF (in fact it is a malicious dropper in the form of a 32bit PE file):

In order to execute its harmful features, it needs to run with Administrator privileges. However, it doesn’t even try to deploy any user account control (UAC) bypass technique. It relies fully on social engineering.
When we try to run it, UAC pops up this alert:
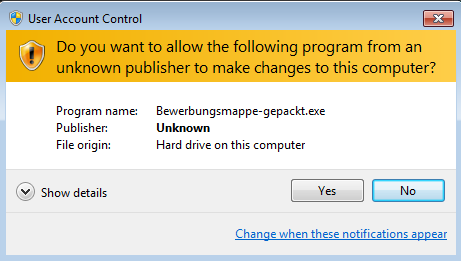
After deploying the application, the system crashes. When it restarts, we see the following screen, which is an imitation of a CHKDSK scan:

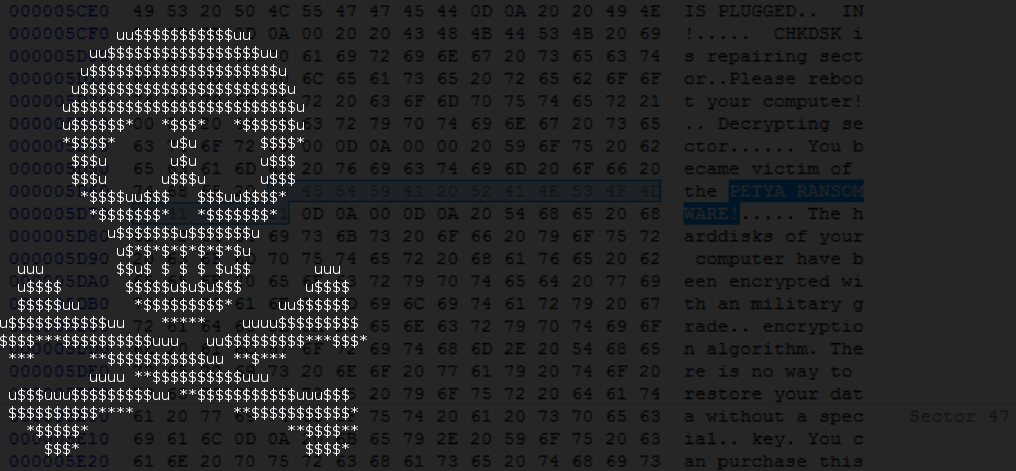
In reality, the malicious kernel is already encrypting. When it finishes, the affected user encounters this blinking screen with an ASCII art:

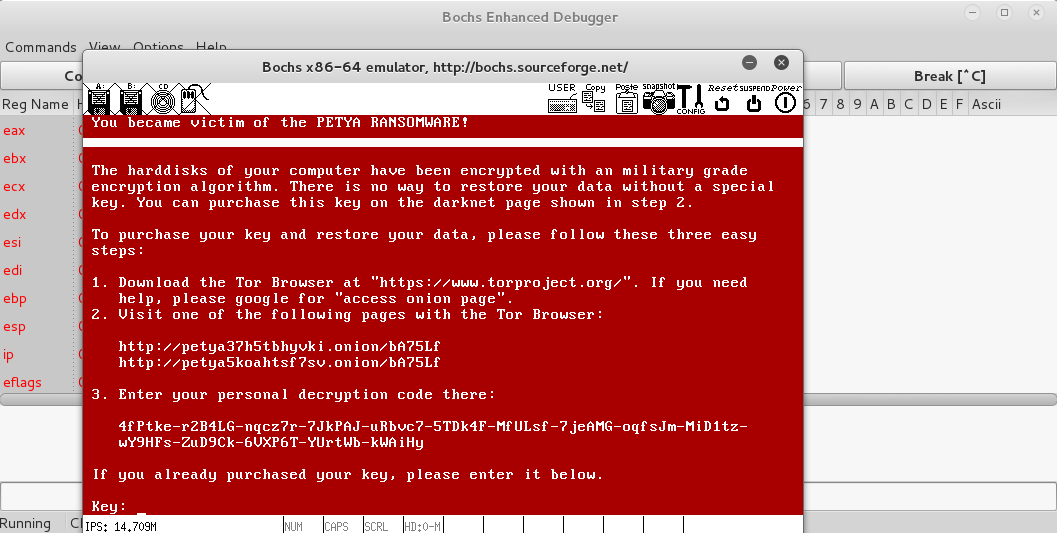
Pressing a key leads to the main screen with the ransom note and all information necessary to reach the Web panel and proceed with the payment:

Infection stages
This ransomware have two infection stages.
The first is executed by the dropper (Windows executable file). It overwrites the beginning of the disk (including MBR) and makes an XOR encrypted backup of the original data. This stage ends with an intentional execution of BSOD. Saving data at this point is relatively easy, because only the beginning of the attacked disk is overwritten. The file system is not destroyed, and we can still mount this disk and use its content. That’s why, if you suspect that you have this ransomware, the first thing we recommend is to not reboot the system. Instead, make a disk dump. Eventually you can, at this stage, mount this disk to another operating system and make the file backup. See also: Petya key decoder.

The second stage is executed by the fake CHKDSK scan. After this, the file system is destroyed and cannot be read.

However, it is not true that the full disk is encrypted. If we view it by forensic tools, we can see many valid elements, including strings.

Website for the victim
We noted that the website for the victim is well prepared and very informative. The menu offers several language versions, but so far only English works:
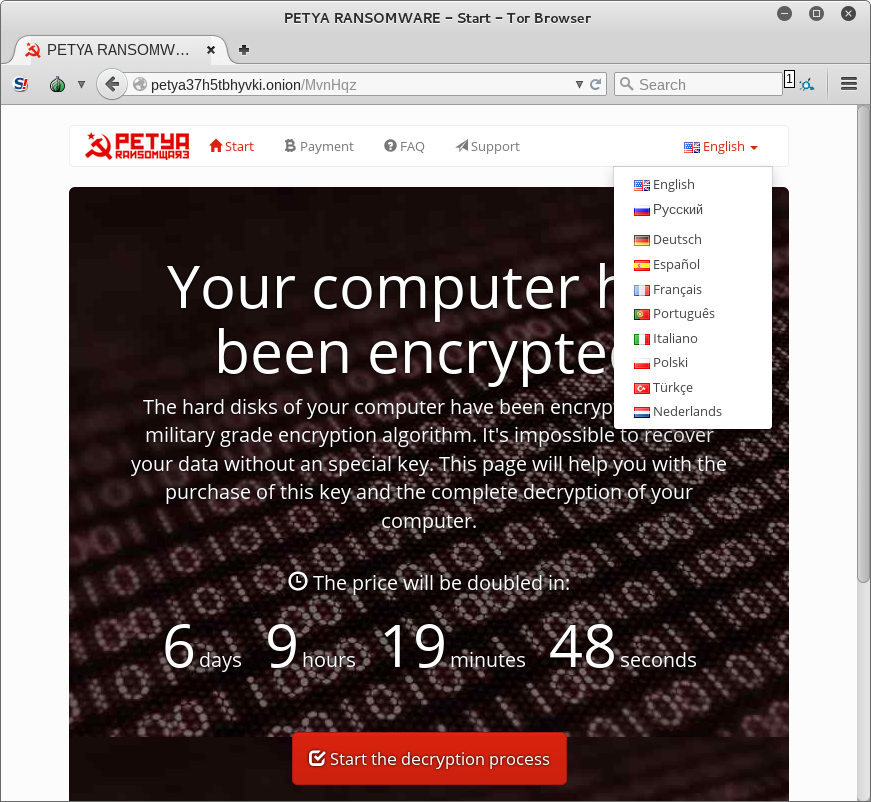
It also provides a step-by-step process on how affected users can recover their data:

- Step1: Enter your personal identifier
- Step2: Purchase Bitcoins
- Step3: Do a Bitcoin transaction
- Step4: Wait for confirmation
We expect that cybercriminals release as little information about themselves as possible. But in this case, the authors and/or distributors are very open, sharing the team name—”Janus Cybercrime Solutions”—and the project release date—12th December 2015. Also, they offer a news feed with updates, including press references about them:
In case of questions or problems, it is also possible to contact them via a Web form.

Inside
Stage 1
As we have stated earlier, the first stage of execution is in the Windows executable. It is packed in a good quality FUD/cryptor that’s why we cannot see the malicious code at first. Executions starts in a layer that is harmless and used only for the purpose of deception and protecting the payload. The real malicious functionality is inside the payload dynamically unpacked to the memory.
Below you can see the memory of the running process. The code belonging to the original EXE is marked red. The unpacked malicious code is marked blue:

The unpacked content is another PE file:
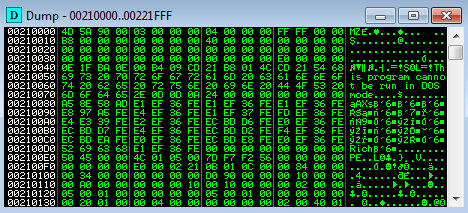
However, if we try to dump it, we don’t get a valid executable. Its data directories are destroyed. The PE file have been processed by the cryptor in order to be loaded in a continuous space, not divided by sections. It lost the ability to run independently, without being loaded by the cryptor’s stub. Addresses saved as RVA are in reality raw addresses.
I have remapped them using a custom tool, and it revealed more information, i.e. the name of this PE file is Setup.dll:
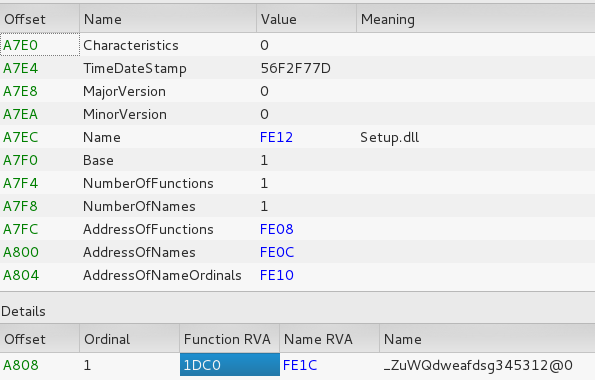
UPDATE: if we catch the process of unpacking in correct moment, we can dump the DLL before it is destroyed. The resulting payload is: 7899d6090efae964024e11f6586a69ce
As the name suggest, the role of the payload is to setup everything for the next stage. First, it generates a unique key that will be used for further encryption. This key must be also known to attackers. That’s why it is encrypted by ECC and displayed to the victim as a personal identifier, that must be send to attackers via personalized page.
Random values are retrieved by Windows Crypto API function: CryptGenRandom. Below, it gets 128 random bytes:
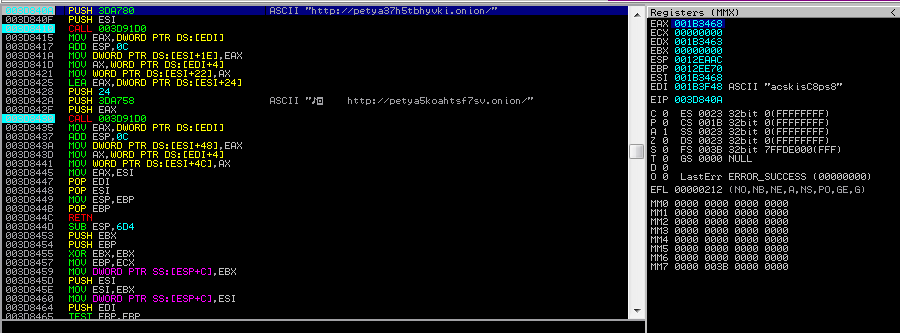
Making of onion addresses:
Retrieving parameters of the disk using DeviceIoControl
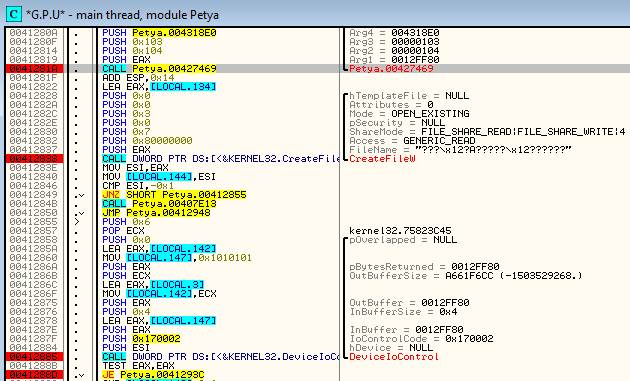
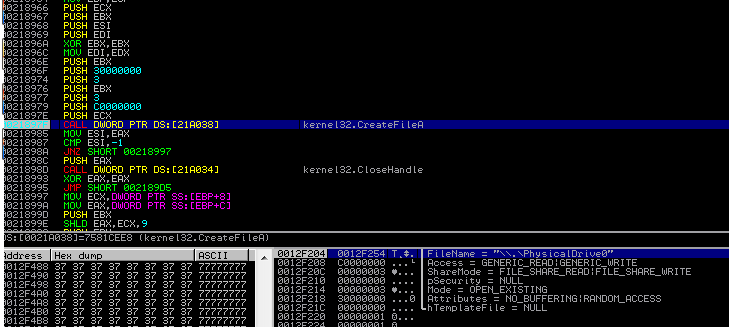
Read/write to the disk:
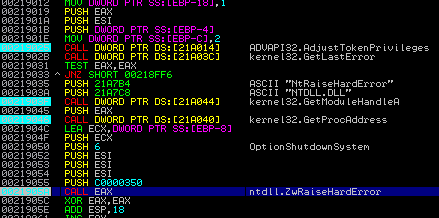
After overwriting the beginning of the disk, it intentionally crashes the system, using an undocumented function NtRaiseHardError:
At this point, first stage of changes on the disk have been already made. Below you can see the MBR overwritten by the Petya’s boot loader:
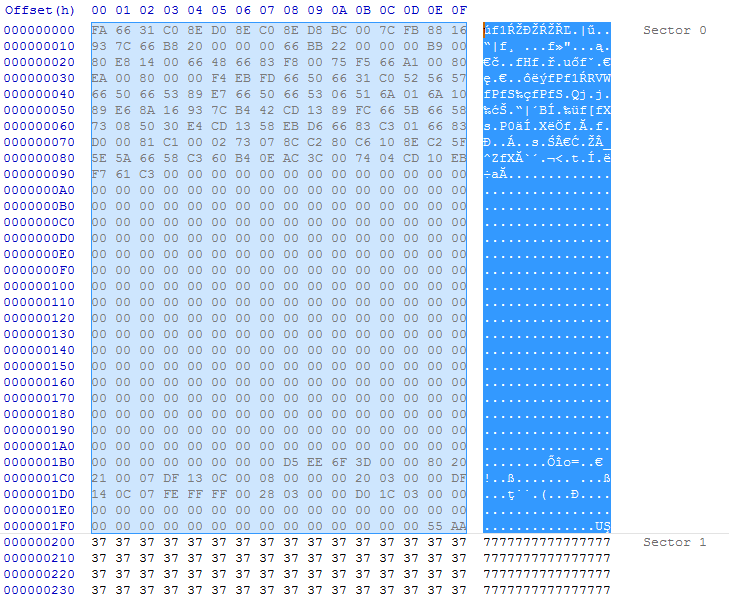
Next few sectors contains backup of original data XORed with ‘7’. After that we can find the copied Petya code (starting at 0x4400 – sector 34).
We can also see the strings that are displayed in the ransom note, copied to the the disk:

Stage 2
Stage 2 is inside the code written to the disk’s beginning. This code uses 16 bit architecture.
Execution starts with a boot loader, that loads into memory the tiny malicious kernel. Below we can see execution of the loading function. Kernel starts at sector 34 and it is 32 sectors long (including saved data):

Beginning of the kernel:

Checking if the data is already encrypted is performed using one byte flag that is saved at the beginning of sector 54. If this flag is unset, program proceeds to the fake CHKDSK scan. Otherwise, it displays the main red screen.
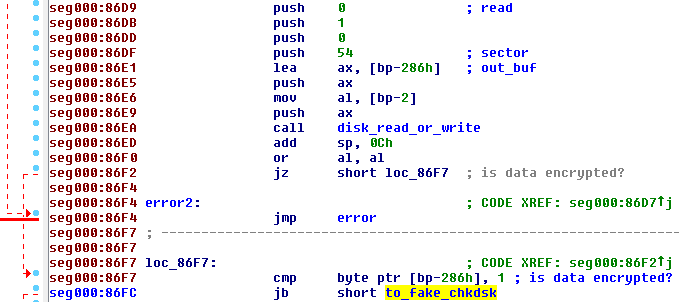
The fake CHKDSK encrypts MFT using Salsa20 algorithm. The used key is 32 byte long, read from the address 0x6C01. After that, the key gets erased.
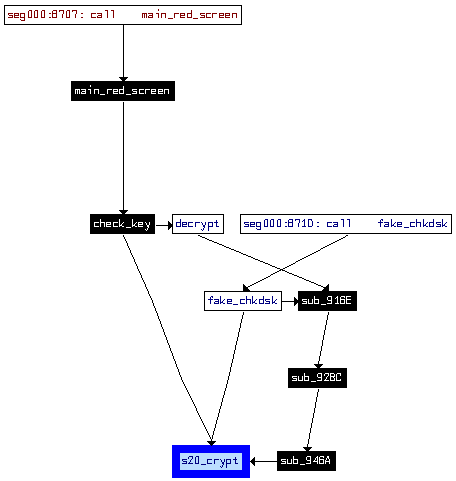
Salsa20 is used in several places in Petya’s code – for encryption, decryption and key verification. See the diagram below:
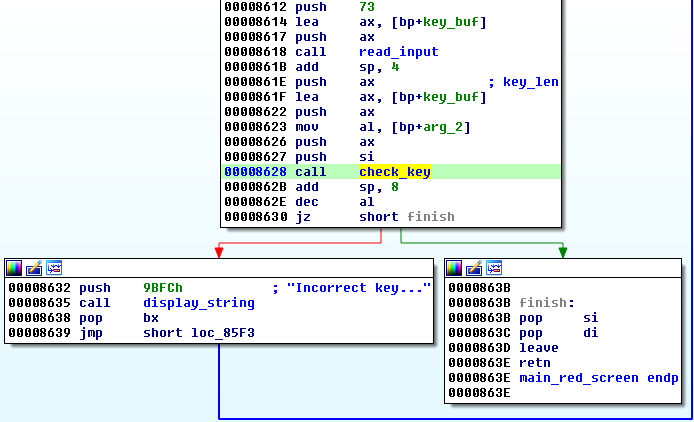
Inside the same function that displays the red screen, the Key checking routine is called. First, user is prompted to supply the key. The maximal input length is 73 bytes, the minimal is 16 bytes.
Debugging
Of course, we cannot debug this stage of Petya via typical userland debuggers that are the casual tools in analyzing malware. We need to go to the low level. The simplest way (in my opinion) is to use Bochs internal debugger. We need to make a full dump of the infected disk. Then, we can load it under Bochs.
I used the following Bochs configuration (‘infected.dsk’ is my disk dump): bochsrc.txt
This is how it looks running under Bochs:
Key verification
Key verification is performed in the following steps:- Input from the user is read.
- Accepted charset: 123456789abcdefghijkmnopqrstuvwxABCDEFGHJKLMNPQRSTUVWX – if the character outside of this charset occurred, it is skipped.
- Only first 16 bytes are stored
- The supplied key is encoded by a custom algorithm. Encoded key is 32 bytes long.
- Data from sector 55 (512 bytes) is read into memory // it will be denoted as verification buffer
- The value stored at physical address 0x6c21 (just before the Tor address) is read into memory. It is an 8 byte long array, unique for a specific infection. // it will be denoted as nonce
- The verification buffer is encrypted by 256 bit
Example: encoded key versus supplied key:”>
The algorithm for encoding the supplied key is very simple:
https://gist.github.com/hasherezade/785f7da52dfd91fe9e59ae283df2e898
Valid key is important for the process of decryption. If we supply a bogus key and try to pass it as valid by modifying jump conditions, Petya will recover the original MBR but other data will not be decrypted properly and the operating system will not run.
When the key passed the check, Petya shows the message “Decrypting sectors” with a progress.
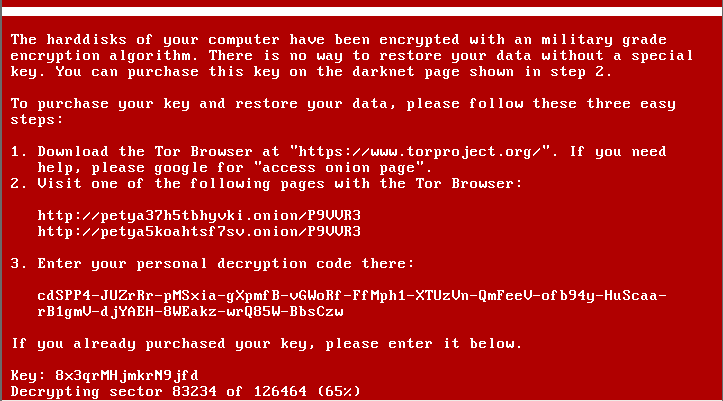
After it finishes, it asks to reboot the computer. Below is Petya’s last screen, showing that user finally got rid of this ransomware:

Conclusion
In terms of architecture, Petya is very advanced and atypical. Good quality FUD, well obfuscated dropper – and the heart of the ransomware – a little kernel – depicts that authors are highly skilled. However, the chosen low-level architecture enforced some limitations, i.e.: small size of code and inability to use API calls. It makes cryptography difficult. That’s why the key was generated by the higher layer – the windows executable. This solution works well, but introduces a weakness that allowed to restore the key (if we manage to catch Petya at Stage 1, before the key is erased). Moreover, authors tried to use a ready made Salsa20 implementation and make slight changes in order to adopt it to 16-bit architecture. But they didn’t realized, that changing size of variables triggers serious vulnerabilities (detailed description you can find in CheckPoint’s article).
Most of the ransomware authors take care of the user experience, so that even a non technical person will have easy way to make a payment. In this case, user experience is very bad. First – denying access to the full system is not only harmful to a user, but also for the ransomware distributor, because it makes much harder for the victim to pay the ransom. Second – the individual identificator is very long and it cannot be copied from the screen. Typing it without mistake is almost impossible.
Overall, authors of Petya ransomware wrote a good quality code, that, however – missed the goals. Ransomware running in userland can be equally or more dangerous.
Appendix
About Petya by other vendors:
- https://blog.gdatasoftware.com/2016/03/28213-ransomware-petya-encrypts-hard-drives – first article about Petya ransomware (by GData)
- https://blog.gdatasoftware.com/2016/03/28226-ransomware-petya-a-technical-review – technical analysis by GData
- http://blog.trendmicro.com/trendlabs-security-intelligence/petya-crypto-ransomware-overwrites-mbr-lock-users-computers/
- http://www.bleepingcomputer.com/news/security/petya-ransomware-skips-the-files-and-encrypts-your-hard-drive-instead/
Read also:
- http://www.invoke-ir.com/2015/05/ontheforensictrail-part2.html – Master Boot Record
- http://sysforensics.org/2012/06/mbr-malware-analysis/ – MBR malware analysis
- https://socprime.com/en/blog/dismantling-killdisk-reverse-of-the-blackenergy-destructive-component/ – Dismantling KillDisk: reverse of the BlackEnergy destructive component (another malware attacking hard disk)
This was a guest post written by Hasherezade, an independent researcher and programmer with a strong interest in InfoSec. She loves going in details about malware and sharing threat information with the community. Check her out on Twitter @hasherezade and her personal blog: https://hshrzd.wordpress.com.
